About Me

My photo
Whilst running round after two bambinos I set up www.kryshees.com making childrens clothes, unique childrens accessories, wonderful nurser adornments and yummy mummy type products. I love things bright and bold and try to bring these into childrens items.

Wednesday, 30 March 2011

Sew Hip : Issue 28 & Kryshees! Woohooo

Horrah! International fame has become mine all mine...feel free to send flowers, stand outside my door paparazzi style!

Because if you stroll into your local news agents, and find your lovely copy of Sew Hip, issue 28, you will spy me oh me! Well my toy basket anyhow. *big grin*

I put together a tutorial for my wonderful squishy Toy Basket and here are the famous pics.


So for now, I shall don my starlet sun glasses and toast myself with some well deserved champers, whilst relaxing on my med cruise...er or with a cuppa and a malted milk biscuit. Cheers!
I do have to thank Beth from http://www.kidsfabrics.co.uk/ for supplying the lovely fabric. So please pop over to their shop as they have some wonderful wonderful fabrics, perfect for your littlies rooms!
 
Mwah!

Tuesday, 29 March 2011

I won a Liebster Award!


I won a Liebster Award! Thank you inallmybrondays. *Does a lil dance*

The Liebster Award is designed to be awarded to ‘small’ blogs with less than 300 subscribers to spread the blog love and get them out to a wider audience.

The rules are:
1. Post displaying the award, linking back to the person who awarded you.
2. Choose your own blog picks and let them know they’re awarded
3. Hope everyone discovers some new favourites
4. Revel in the blog love!

Here are my choices to receive the award. I hope you enjoy!

Zukie Style for wonderful wonderful bags, perfect for that special night out.

Curious Cat Creative Who is just a creative genius when it comes to leather! God this lass is good.

Vibrant Glass Art who works with glass and colour in ways I can hardly grasp.

xx

Monday, 28 March 2011

Kryshees Willow Garden Rocket!

Thanks to Wendy for hosting Handmade Monday! Lots of other lovelies on http://www.1stuniquegifts.co.uk/blog/2011/03/handmade-monday-9/

hmm ok, I'm not quite sure that when I started out, I wanted to build a rocket...but thats what I now have!

I have a honey suckle that used to rest on some trellis that we took down in the great gravel removal program (thanks to freecycle) and since then its been flopping on the border looking sad..

Great Kryshees Plan #578 in action...retrieve willow thats been in my shed for at least 8 years...fail to soak it as excitment kicks in!! And start making...er something!

Hubby was giving me 'that' look during the construction phase...well yes...I needed about 7 hands to hold it together on the first and second ring of weaving...hence no pics! And willow was flying everywhere. Luckily ds was having a nap, so one kiddie out of the way.

And the darn stuff was fairly brittle so I did have to go careful and it was all a bit ricketty! Not the neatest creation I will admit!

The uprights were a bit of a beast as the bottoms were bent inwards due to the natural curve of the dry willow on the thicker section. This did not help the ricketti-ness!

In hindsight I should have cut these off, cut a spike and shoved them in the ground...

But despite old willow and lack of soaking, my construction started to take shape. I really had forgotten a lot of my few basket weaving skill, ok, all of them. But this thing was still growing.


Till I had finally put in enough rings and with help, over the honey suckle it went. Its still a bit wonky as it is only resting on the soil at an angle, so needs a bit of jiggerypokery to get it more secure. One puff of wind and I'm sure the rocket will take off!


But it has added some height into the garden and some structure, and even hubby (and his doubtful bbq friend) admitted it looked ok...thanks for the support!!

So a scoot away from my 'normal' crafting for the weekend, and perhaps I should have stuck to sewing.

(Mental note to self : Soak willow before use!)


Thursday, 24 March 2011

Experiment #46 - Waterproof Wet Bag

Ok...so its a little odd...a million wet bags out there and a small percentage of them are actually waterproof...as in, they might be made from waterproof material but actually you couldn't pour in a glass of water!!

I know, I know, the average Joe might not want to do this, but it intrigued me. And I'm not an average Joe...I'm Krysia.
It really is very, very different...

The 'general' wetbag is great for wrung swim suits, baby cream and wet cloth nappies. All things that aren't actually dripping wet.

But really, tell me, when faced with a poopy nappy (which you'd probably flush the contents away and then have a rather wet nappy) .... would you wring it??
Or would you rather prefer that your wet bag didn't leak at all?

So...a waterproof wet bag.


Experiment #46 is not bad as a prototype. It measures 11 inches wide by 8 inches deep. It has a popper strip to attach to your buggy. It closes with a zipper. This is something I want to work on as this still will leak.

But not bad, not bad..


Tuesday, 22 March 2011

Kryshees - Coming soon to Sew Hip

I'm very excited as I received my Sew Hip magazine which is on a subscription (kind hubby) and there on the back cover is one of my toy baskets (Issue 27 if you want to peek!)


In issue 28 you will find the pattern and notes on how make this item all for yourself.


And of course I receive international stardom!! Perhaps I'm a little over excited, but well, why the heck not?

I have to thank Beth from http://www.kidsfabrics.co.uk/ for supplying this lovely fabric and please pop over to their shop as they have some wonderful wonderful fabrics, perfect for your littlies rooms!


Friday, 18 March 2011

Red Riding Hood - Red Nose Day!

Today is my dd nursery red nose day fancy dress. If you've been following my blog you may have recalled (some months ago - ekk!) the hint of red riding hood cape...and the nursery fancy dress in aid of red nose day, was the kick up the bum I needed!

I brought some beautiful red riding hood mushroom coloured linen ages ago with this project in mind. I used the linen to line the hood and there was enough of the fq left to make a basket liner too!


The pattern was amazingly simple in the end being made up as I cut (danger danger!) I had googled a bit to look at some pictures and they all seemed overly complicated. Not too sure why to be honest. I just cut out a curvey cirle from a square of fabric on the fold, and then cut a curve for the hood to attach on.

The hood I lined to give it more structure and also to show of the fabby linen. The hood is also top stitched to help hold it all together and the drape is lovely that way too.

I used a rectangle tab with magnetic fasteners rather than ribbons. So no tangled ribbons and dd can pop it on all by herself! Bonus!


So here is dd fully caped up! Basket in hand, with a gingham cloth to cover over those basket goodies! Ready to trott to nursery!

Tuesday, 15 March 2011

Some recent craftings!

I've been a bit manic with birthdays and last min sewing/cooking/cleaning and the like. So finally got round to taking some pics and listing them on folksy and up to my new spangly fb page

So here they are, in no relevent order!

Large image


Large image


Large image

Hope you enjoy them and soon I'll pop up the 'new' dresses too!

Sunday, 13 March 2011

Birthday Party Time!

A few pics from our glorious time on saturday. We got the infamous watson luck with the weather again on saturday and were able to get the bouncy castle in. Woohoo!

So some pics from la weekend (mostly cake and food - be warned!) And the infamous Hippo.

Lunch table! Some family favourites including a breakfast pie and sausage pie from the Delicious Mag!
Cake pops - No explaination needed here me thinks!
My lovely cake stand comes out on every occasion, and sets the cupcakes up lovely!
The darn hippo! Ok so he took me a some time to make for ds, and despite a bit of a crinkly bottom, he's looking lovely! 

Now to tidy up :o(

Monday, 7 March 2011

Kryshees Lemony Cake Pop Fun!!

Thank you Wendy from http://www.1stuniquegifts.co.uk/ for hosting Handmade Monday again! Pop over to her blog to visit Wendy and other bloggers on Handmade Monday http://www.1stuniquegifts.co.uk/blog/

Earlier this week a friend introduced me to cake pops (perhaps some of you noticed my manic ramblings on fb and twitter!) It was really everso exciting. I paid a little visit to a wonderful cake shop in Christchurch and brought some supplies, mainly candy melts and lolly sticks.

My friend Penny and I got a little over excited making these things, and they really were yummy. Needless to say we scoffed the few that we made on the day!! My bambinos were addicted, so we made some more over the weekend!!! YUMMEEE!!!

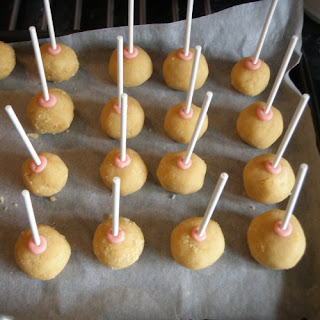
So heres how they were made. I used a 4oz sponge cake recipe (4oz sugar, marg, SR flour and 2 eggs). Crumbled the cake up into wee lil crumbs, ok so some of it may have been consumed in the process..opp

I made butter icing up according to the back of the icing packet, 6oz icing sugar and 3 oz butter. I added in some lemon zest and lemon juice to combine it all up. This got mixed into the cake crumbs and rolled into balls. I made about 20 odd balls out of this recipe amount.


The candy melts (like chocolate but minus the cocoa) were melted in the microwave, and after pre 'lolly sticking' the balls, we got a dunking! They dry pretty quick so sprinkles were liberally applied and popped into some spare oasis I had in the shed to keep them upright.


These guys really didn't hang around for long!


I'm off to hobbycraft in a mo to get some more supplies as its my sons birthday this week and these would be great for the party. Perhaps a little smaller than the previous ones. But ooo excited at making more.

If you are tempted to make some, there is a cakepops book and lots of piccies on google to look at for inspiration!!